Pages

Monday, October 19, 2015

Easy and Delicious Frappe Recipe

In this simple and yummy recipe, I'll teach you how to make a frappe. At Colectivo or Starbucks they can be pretty expensive...plus you can make this anytime and any flavor you want!
By the way, I got a nice DSLR camera, so my blog photos will be much better, now!


Here's what you'll need:
Ice cubes
Coffee (It can be any kind. I usually use leftovers my parent's didn't drink in the morning, but you could also use coffee from a Keurig machine or instant coffee).
Milk or coffee creamer
Chocolate or caramel syrup
A blender
 
Step #1.
Add approximately 2 cups of ice to your blender.
 
Step #2.
Add 1/2 a cup coffee and 1/4 cup milk or creamer
 
Step #3.
Add chocolate or caramel syrup
There are tons of recipes out there for different flavor frappes, like s'mores, birthday cake, probably cotton candy, and a lot more and I may do some things like that in the future, but for now I just added chocolate syrup.
 
Step #4.
Blend!
Warning: This is very loud...
Blend until the crunching noises aren't super loud and it looks similar to this!
 
Step #4.
Pour and Drink
I always put a layer of chocolate syrup on the bottom, and once I've poured in the frappe I add a swirl to the top, too. You could also add whipped cream but I didn't have any.
 
This is really yummy and easy! I hope to do more recipes soon. :)


Monday, September 28, 2015

DIY Room Makeover, Pt. 3

In this post I am going to share with you the third and final part of my DIY Room Makeover - which is about diy décor for your room.
Even though this is the last part of my DIY Room Makeover, I'm going to do a post about my final result of my room makeover - kind of like a room tour. That might not be super soon though, because I haven't painted my room or gotten new bedding and rugs yet....
But before we begin, I want to acknowledge that today is the 1 year anniversary of my blog! How cool is that? I actually created my blog in January 2014, but didn't do a real post until September 28, 2014. It's been really fun blogging and I can't wait to expand and improve my blog! Thank you to all who read. I really appreciate it. Also, thanks to my mom over at Commonplace and Curious for helping me create my blog and for always looking over my posts. :)
On with the post:
DIY #1.
Bandana Pillows
You will need a plain white bandana (1) (I got mine at Walmart in the craft section for 99 cents), fabrics markers, scissors, hot glue, and stencils (optional).

First, I cut my bandana in half (2), then folded them in half to make the pillow size I wanted (3). You can make your pillow any shape or size you want. Next I used my fabrics markers (4) and some letter stencils to write on my pillow (5). You could draw/write anything on your pillow: a quote, your favorite animal, a saying, your initials, etc. I wrote "Autumn Days" with a heart on one of my pillows (6), and on the other one I wrote "No matter what happens, be good to people", which is part of a Taylor Swift quote.
You can go back and thicken or tweak the letters if you want (7). The next step is to glue your pillow sides together (8). Be sure to leave an opening for stuffing. You can also sew this if you want! Then of course, stuff it! (9). The final product should look something like this (10). Stuff your pillow with a lot of stuffing, because if you don't stuff them enough, it won't look as good. That's what happened with my second one, but it's still nice. These are super cute and you can totally personalize them! :)
I also made a pillow that said "DREAM" out of some fabrics scraps.
DIY #2.
Easy Wall Quotes
This is super simple and cute! First, I opened one of my photos in PicMonkey (1). Hover over 'edit' and click 'computer' to import one of your photos.  Edit it however you like (2). I just put a filter on my photo. Then, add your quote or saying in whatever font and size you like (3 and 4). Click on the little 'Tt' button, select your font, then 'add text' to do that. Now, I saved it and opened it in Microsoft Publisher, and adjusted the size (5). You can now print it out (6). These would look great framed, or you could just tape them to the wall.

DIY #3.
Leaf Garland
For this you'll need:
Pressed leaves* (1)
Paint and paintbrushes (optional)
Mod Podge and sponge brush
String
Hot glue
*Mine were from last year but you can easily press leaves by sticking them in between the pages of a phonebook.

What I did first was paint both sides of my leaves and let them dry (2, 3, and 4). Painting is optional, but I like it because it makes the leaves brighter. Also, if you can't wait for fall, but you can only find green leaves, you can add some of the fall color.
If you want a more realistic look, use a small brush and similar colors and slowly add details. Otherwise, just go ahead and make it a bright bold color. I had some metallic paint, and that looked really cool. Next, paint both sides with a layer of Mod Podge (5).
This gives a nice finish and also adds strength to the leaves so they are more durable. Let that dry (6). I then hot glued the leaves to the string (7). You can try tying them on, but I failed at that! :) Now, hang them up (8 and 9).


That's all for today's post! I hope you enjoyed it. It's really fun making all sorts of room décor! I am definitely going to have more posts about room décor in the future.


Monday, September 21, 2015

A Few Of My Favorite Quotes


Hello everyone! In today's short and simple post I'm going to be sharing some of my favorite quotes and sayings.
(All these photos are via Pinterest and I do not own any of them!)
 
#1.
 
 
#2.
 
 
#3.
 
 
#4.


#5.


#6.


#7.


#8.


#9.


#10.
 
That's it for today's post. I hope you enjoyed these quotes and sayings and got some inspiration from them. Remember, my DIY Room Makeover Pt. 3 - Décor will be coming soon! I'm super excited about that post. :)

Wednesday, September 16, 2015

DIY Room Makeover - Pt. 2

Yay! It's finally here. Part 2 of my DIY Room Makeover. But wait! If you haven't seen my DIY Room Makeover Pt. 1, go check that out here: http://thecreativitytree.blogspot.com/2015/09/diy-room-makeover-pt-1.html
In this post, I'm going to show you a few organizational DIY's and storage ideas.

#1. Double Organizer
You will need:
Two cardboard boxes, one smaller, one bigger (1)
Tape
Scissors
Hot Glue
Paper and/or duct tape for decorating
First, fold in the bottom flaps and tape them (2)
Next, cut off the top flaps (3). Then, apply hot glue on the back of the smaller box (4), and glue it onto the larger box. Now all that's left to do is decorate. I used mod podge and paper (5), and also duct tape. I really like using duct tape and washi tape because it's so easy! :)
Now you have two places to put papers. A smaller pocket and a bigger pocket. I really like this and hope you enjoy it, too!

#2.
Kitty Organizer
No, I'm not talking about organizing your cats...
I'm talking about this:
Here's what you'll need:
A clean liter soda bottle
Scissors
White spray paint
Sharpies/markers
First, I just drew a line with a sharpie to give me a guide of where to cut (1). I left my self lots of extra space so I would have wiggle room when cutting the ears. Then of course I cut on the line (2). Next, I cut out the ears of the cat. (3 and 4). There's not really any way to explain that. I suggest that you use a sharpie to draw the ears on, then cut. It will be more neat that way. I then spray painted it white (5). (Note: You will want to do this outside and with the help of a parent.) I started to paint my kitty with regular acrylic paint, but it would've taken a lot of coats to make it opaque, so I just spray painted it. It turned out pretty well. (6). Now, all that's left to do is draw on the face (7). I printed out the picture of the planter I saw on Pinterest as a reference. I did not spray paint the inside of my organizer, so it's still green. I am probably going to either use washi tape to cover the inside, or just set some tissue paper or fabric inside. This is really simple and I think it's adorable! You could also make this a dog or panda or bunny or anything you want. :)

#3.
Origami Boxes with Lids
http://www.origamiway.com/origami-box.shtml
I absolutely love these for storage! They are perfect for storing little trinkets. Plus, you can stack them. I think the tutorial is pretty simple if you take your time. You'll notice they use standard origami paper. But that makes pretty small boxes. You may want to use 12x12 paper, which is what I usually use. If you use 12x12 paper, your boxes will be the size mine are in the photos below.

Here I used the halves of the boxes and pinned them to my bulletin board to make washi tape storage.
But they would be great for any type of storage. For example, do you have a junk box that you just throw random stuff in? I do. But, it's not really organized if it's in a box, it's just hidden. So I think I'm going to make some boxes, label them, and then sort the things inside my junk box into them!
#4.
Mason Jars
Mason Jars are awesome for storage!

I'm storing my sunglasses in this one. :)

Well, I hope you enjoyed this post! I'm really excited for Pt. 3 of my room makeover, which is DIY Room Décor, but I may have some other posts before that. :)
Have a nice Wednesday!

Thursday, September 3, 2015

DIY Room Makeover - Pt. 1

I am currently re-doing my room, and I'm right splat in the middle of it.
I've been wanting and wanting to write this post for a while, so I'm super excited. 
I am going to have 3 posts, or parts, to my room makeover. So, the first step to my room makeover is to make a plan. This is pretty simple, so this post is going to be short. My other two posts will be longer. Anyhow, let's get started!

#1. Sketch
I drew the outline of my room, and then drew my pieces of furniture on a different piece of paper, cut them out, and then arranged them on my room outline. This way you can change up your plan anytime. Be super creative with this. If you can't paint, moving furniture makes your room look a lot different. I just love moving around my furniture, because it's like, "Wait, my bed could be over there!", and "Hmm, I never thought of putting my dresser here."


#2. Make a List
Making a list of what you need to do and get helps a lot.
Here is an example list:

Get new bedding
Clean rugs
Paint
Organize closet
Paint nightstand
Make wall décor

#3. Planning
Yes, just random planning.
For example, you have some frames hanging on the wall with different things in them, but they're not going to with your new room theme. So, you are going to paint them a different color and put something different in them. But, which wall are you going to put them on....hmm? Also, maybe you should move the storage bins out of your closet so you'll have more space...but where will you put them?
You get it. I think planning helps because then you actually do stuff instead of just talking about it. Speaking of planning, have you seen my last post about making a DIY planner? Click here to see it!


Coming up next......DIY Room Makeover - Pt. 2 - Organizing and Cleaning

Thursday, August 27, 2015

DIY Planner

Back to school is right around the corner, and it's time to start getting ready. So, in this post, I'll be showing you how to make an awesome and easy planner to keep you organized and ready for school.

What you'll need:
A spiral bound lined notebook (this is what I used, but you could also use a spiral bound graph paper notebook). Mine also had a little pocket just inside the cover, which is really nice.
You'll also need:
A pencil
Gel Pens (You can use regular pens but colorful pens are much better.)
Washi tape, stickers, or other decorating materials

Instructions:
The first thing you'll probably want to do is decorate the cover. I used washi tape, but you could cover it in a piece of colorful scrapbook paper, paint it, or whatever you want.
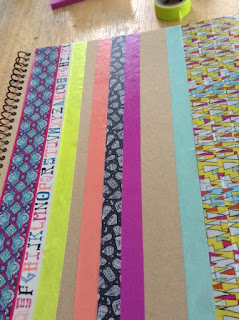
I left some spaces because I thought the brown added a nice touch.

I made sure to cover up the logo,
and other stuff I didn't want on the cover of
my planner.
Once you've decorated the cover, it's time to start laying out the inside of your planner.
I used a ruler, and every eight columns, I used a colorful pen to highlight one of the lines. This created four sections. You will notice there is a little extra space on the top and bottom, but you can just decorate that area. Now, your notebook might be a different size then mine, so you'll just have to experiment and make adjustments. I had to do a lot of experimenting.

Next, I wrote the month at the top and the dates in the columns.
The next step was making some vertical lines to split the columns into three sections.
Basically, what I did was use a colorful pen to draw the line that separates the dates from the squares. Then, I measured 6cm from that line and marked it with a pencil. The next thing I did was line up my ruler with that mark, and make a line through all the columns with my pen. I then repeated that step once more to accomplish what you see in the photo.
Again, for your notebook, it might be different.

You probably saw in the last photo, that I had three things written at the top of my planner.
Well, those are just the things I wanted to put. I'll explain:
The "Schedule" section is kind of like a checklist. I write down what I need to do everyday in the Schedule section and check it off when I'm done with whatever I had to do.
The "To Do" section is pretty self explanatory. It's a to-do list. But, this is different than my routine section because it's stuff I need to do that doesn't happen everyday. Like,  write blog post or clean room. It could be pick up books at library or download photos onto computer.
The third section is "Events", which by the way, you could just title "Calendar", because that's basically what it is. I'll be writing stuff you'd write on a calendar, such as appointments, outings, gatherings, etc. You get the point.

 Of course, you can make your categories anything you want. These are just the three things that I wanted in my planner. This way, when I open my planner, I can know what I have to get done, what I should get done, and what I have going on that day.

Add some washi tape on your pages to bring a lot of color!

Now that you have the basics of making a planner down, you just have to keep making pages and writing things in. Of course, you don't have to write in a whole year (or however long you want your planner to go on) in one time period. A good time to do this might be while watching TV or listening to music. I love my planner so much because I can customize it however I want.
You could also add in pages that have inspiring quotes on them or have some photos on them.
Have fun!

P.S. I have tons of cool ideas for more DIY posts, so stay tuned if you like them! :)


Monday, August 3, 2015

Roadtrip Fun

Road trips are great, but admit it, they get a little boring, especially if you feel sick when you do certain things in the car. I feel kind of sick when I watch movies, specifically when they are on one of those built in movie screens on the ceilings of cars. So, here is a list of things you can do in the car to cure your boredom.

1. Mad Libs
Mad Libs are so fun! And funny. You can do them alone, but if you want more funny stories, it's best to do these with friends/family. If you can get your whole family to play, awesome!

Image via google images
If you don't have a Mad Libs book on hand, you can print Mad Libs here.

2. License Plate  Count
This is great when you are driving through several states! Before your trip, write down all the states on a sheet of paper, then when you are driving, say someone passes you with a Kentucky license plate, then make a tally next to Kentucky, etc, etc.  If you want, you can write the license plate of every car that passes you on the whole trip, but let's be honest, that's a lot of license plates, and you might want to do a different activity on your car trip. :) I love this, it's so fun! I also sometimes count billboard signs (like firework signs).
Image via google images
3. Collage
I think it would be really fun to do this! Before your trip, you would print out pictures of the place you are going and also landmarks or locations you are visiting. You could bring a glue stick and notebook, and on the car ride there, paste in the photos and write some things you are excited about, or what you think certain places will be like, whatever you want. When you are there, take pictures of all the places you go. When you get home, you can print them out, paste them onto the next page, and write about your trip and what you loved most. :)
Image via google images
4. Journaling
You could add journaling to your collage and make a scrapbook out of it! Basically, just journal in the car, and each day when you are there. It'll be a fun way to remember things! I guess this isn't exactly a thing to do in the car, but you can do part of it in the car

5. Color/Do An Activity Book
Coloring is super fun!!! If you don't have a coloring book, there are tons of websites you can print pages from.
I like these ones from hallmark: http://ideas.hallmark.com/summer-ideas/summer-coloring-pages/?mc=T_E_M_062915_HM_VA_ColoringPages
And Mr. Printables has a ton too: http://mrprintables.com/printable-coloring-pages.html
They have really awesome giant coloring pages on there, too!
As for the activity books, I'm sure you can get printables for that, too! But, try and think up some of your own and make a booklet of them! For example, put in car quotes! "Are we there yet?" said _________________. I think car quotes are super funny! I actually saw those in a book, called All You Need Is A Pencil: The Stuck In A Car, Train, Or Plane Activitiy Book. If you can get this, do! I saw it at Barnes and Noble and wanted it! Otherwise, as I was saying, make your own. That is just as awesome! You can fill it with jokes, tongue twisters, tic-tac-toe boards, doodle pages, games like hangman or "would you rather" (or make your own game up), etc. Have fun with it!
Image via google images
6. Guessing Games
I played a "guess the song" game with my cousins on a recent roadtrip. One person would hum a tune and the others had to guess it! It would also be fun to do movies/books. You would have to describe a movie/book without saying the title, characters names, authors name, etc.

7. Listen To Music/Audiobook
Want to read a book but it makes you sick to your stomach? Listen to an audiobook! Also listen to music, it will make you a lot happier in the car. Music seems to always lift my mood. The bonus? You can listen to music while doing these activities in the car! Unless you are doing them with another person.

Image via google images
Well, I hope you enjoyed this post!  Go have a fun road trip! You can comment down below if you want. You can also pin my posts on Pinterest, so go do that!