Pages

Monday, July 6, 2015

Fantastic Photography

A few weeks ago, I did a photography camp at an art center. We got to use nice cameras, we went to some cool locations, and it was a lot of fun.

In this post, I will be sharing with you some of these photos. :)

Some bright flowers I saw when we were walking around the neighborhood.
You may notice in some of the photos, the subject of the photo (in this case the flowers) are offset. That is called the "rule of thirds." Have you every had a grid set on your camera? Imagine drawing a tic-tac-toe board on the photo, or a large hashtag. That's basically rule of thirds. The subject would be in one of the nine squares, instead of simply being centered in the middle. More on the rule of thirds here. 
 
A dreamy dandelion near the beach...
Here is another rule of thirds photo of a dandelion. This could be considered a close-up, because the dandelion is focused in on, and the background is slightly blurry.
These flowers and plants were in a big pot outside a shop.
This photo may seem a bit random...the yellow flower near the middle is the subject of the photo. The brownish-red plant is framing it. Framing in a photo is when the person or object in the photo is in a sort of frame. They could be standing in a doorframe or by a big open window.  It could be by a fence or a tree branch. Let's just say there are lots of options. If you'd like to see some more examples of framing, click here.
 

 This is one of my favorite photos. I love getting up-close and seeing things so clearly.
 This is a close-up, or what they call a "macro" (short for macrophotography) of a tree.
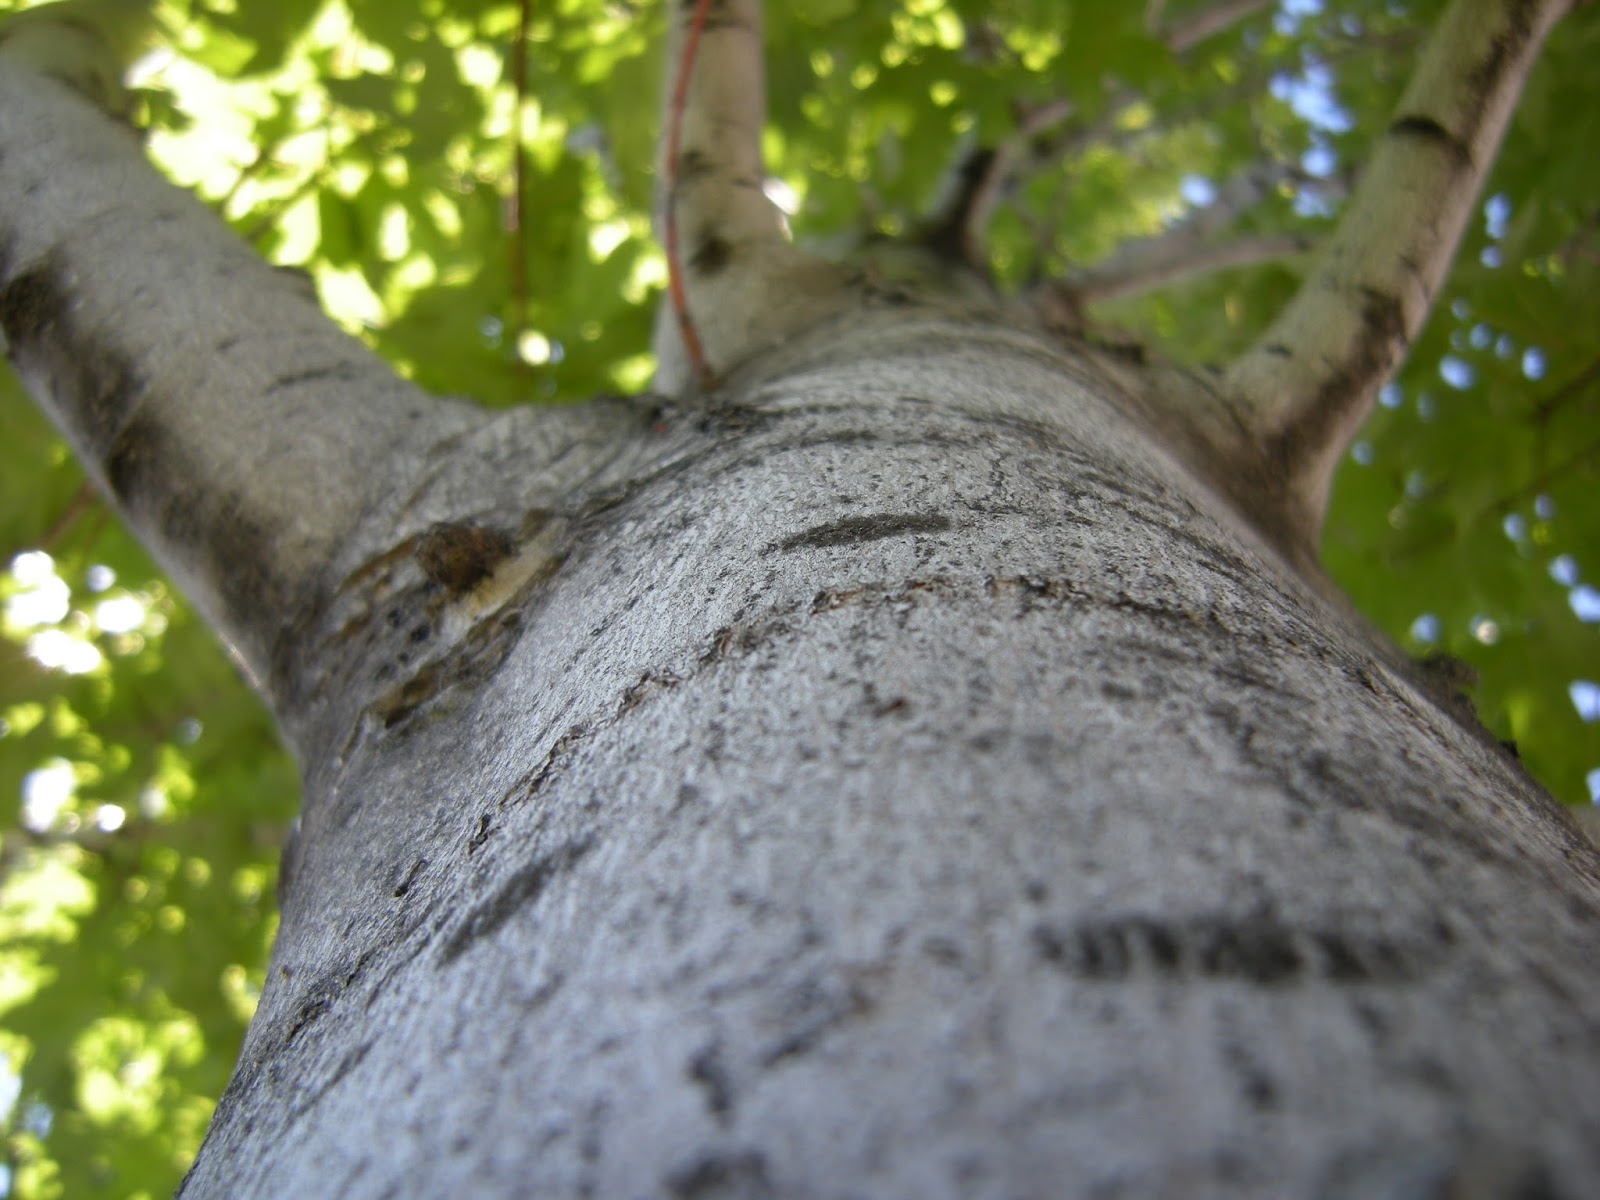
A "macro" photo captures the texture of something. It could be a tree, like in the photograph pictured above. I think macrophotography is fun. I always like getting really close to something and taking a clear, focused picture of it.
 
Here is another macro of a dog's nose and face.
 You can see the sort of dot texture on his nose.
This is an action shot, too. It seems as if the dog was sitting still, almost posing...but he was moving, and it was hard to take a photo of him. Though action shots are hard, they are often the best, because they capture moments and emotions.

The lake and sky looked gorgeous that day!
 
This is a landscape photo, which has three elements:  foreground, middle ground, and background. In this photo, the foreground is the rock, which I had the camera set on. The middle ground would be the lake, and the background would be the clouds and sky.
 
I absolutely love this shot of a rock, with the lake in the background. It's another macro shot. You can totally see the texture and details of the rock.
The clouds were really pretty. I love clouds when they are like this. This photo would look even better with a filter.
 
A beautiful day to be in the park. The boats looked really nice floating on the lake, the grass was green, the sky was blue.
 Above is another landscape of the lake, and below is the same photo but in a different view. I guess it could be a bugs-eye view. I've always loved getting into a different perspective:  laying down, looking up, shooting pictures in a different angle, etc.
The grass is close-up and focused on, so I guess this could also be considered a macro.
Speaking of perspective, I took the photo below by getting really close to the tree and then pointing the camera upward.


A great macro of some really cool tree bark.
Well, those are all the photos I will be sharing today. I have more and will take more soon so hopefully I will do another post on photography.
I hope you enjoyed this post! If you like my blog, share it with friends and family. Also, please go check out this awesome blog: The Earth Walk. There is an awesome post about dolphins on there, which sort of relates to my post about orca whales.
More posts coming soon, so stay tuned! :)

Thursday, April 16, 2015

Cheerful Chalk

A couple of days ago, my Mom and I did some cool chalk art on the front sidewalk. Today I will be blogging about it!
 
We did this a while ago, and we did it again yesterday. It's really fun and relaxing. We each had our own square of sidewalk, and we did doodles and zentangle designs on them. It's really bright and a great spring activity. It gives a great splash of color on your front walk.
Try all sorts of creative doodles, you can write words, just do patterns, draw something and do patterns around it, etc. Just fill the square. The possibilities are endless! Buy some cool new chalk if you want. We tried some "glitter chalk", it was really nice, and sparkles in the sun. Someday I want to chalk the whole portion of our front sidewalk! But I would need a lot of chalk. :)
 
Enjoy these photos:


Well, I hope you enjoyed this short little post. Go outside today and fill in a whole square of sidewalk with chalk. It's really fun! And it's great to see people walk by and look at it.
If you have a Pinterest, you can Pin my post on Pinterest, and also share it on other social medias. Scroll to the bottom of a post, and there is a bar with options to Pin, Post, Tweet, and more.
I am very pleased to say my last post got around 100 views and lots of comments! I just want to thank you all so much for reading my blog and supporting me. It makes me really happy! Thank you!
Stay tuned for more posts coming soon to The Creativity Tree!
 
***
There are many zentangle books out there, but here is the link to one we enjoy:
Zenspirations


Monday, March 30, 2015

Spring Crayon Art

Hello and welcome to The Creativity Tree!
 Sorry I haven't done a post in a while. But now, with Spring and Easter right around the corner, I decided, why not create some colorful crayon art for Spring. So, enjoy!

What you need:
Crayons, new or old
A canvas
A blow-dryer
Hot glue gun
Newspaper and cardboard
(to protect your workspace)

Instructions:
Start with your crayons and your canvas. You can decide to place your crayons however you want. The rainbow pattern, ROY G BIV, is very popular for crayon art, and that is what I used, but you can do any colors and patterns you want. Be creative with the shades of colors you use. Arrange the crayons on the canvas the way you would like. Remember, they don't have to go across the top. You could glue them in the middle for example. (Also, don't worry about the brand of crayons you use. I used a large variety and it worked totally fine; it's just that some crayons melt faster than others.)
Once you are happy with the arrangement of your crayons, it's time to glue them.
I glued a strip of glue onto the back of each crayon and then stuck them into place. Don't be shy with the glue, because you don't want the crayons to fall off the canvas when you are blow-drying it. But be careful with the hot glue, it can get really hot. I even burned myself. :( 


Now, let the glue dry and cool. (Hot glue dries very quickly, but just make sure it is fully dry before you blow-dry.) To test if your crayons are dry and set, shake your canvas around a bit or knock the bottom of it on a hard surface. If there are loose crayons, they'll probably fall off.
Now, it's time to blow-dry! You will want to prop the canvas up when blow-drying.

We set up lots of newspaper on the floor and wall, and set a piece of cardboard on the wall, then set the canvas on top of that. (Beware, this is very messy and the melted crayon can splash everywhere, so set up lots of newspaper. When I did it, some splashed on the wall and floor, but it came off.)
Blow dry on high, heating all the crayons evenly. Start towards the middle of the crayons, like where the logos are. They will first start getting wet/shiny, then start splashing onto the canvas. To prevent lots of wax from splashing off the canvas, start blow-drying from the top, pointing downwards. This will cause the wax to run down and onto the canvas instead of splashing everywhere.  
Keep heating until you get your desired look. The longer you heat it, the more it is going to mix together and blend, so beware of that.
And you're done! Let it dry/cool/harden in an upright position. Then you can set it on a shelf, hang it on a wall, etc.
This project is perfect for Spring because it has bold, bright, happy colors!
It's super simple and fun! You can also make them any size you want! It is great Spring/Summer décor and could also be an awesome gift!

Well, I hope you enjoyed this post! Please share it! You can Pin It on Pinterest, email it to friends, share it on Facebook, and more! Also please leave comments and subscribe to my blog so you can get notifications when I have a new post! :)
I hope to post more DIY's soon, so stay tuned!


Here is a cool time-lapse video that I took of the crayons melting.

Monday, February 9, 2015

Valentine's Day Candy Bark


Welcome to The Creativity Tree!

Today I will be doing a tutorial on making Valentine's Day candy bark.

The finished product

What you will need:
Candy melts (I got these red, vanilla flavored candy melts at Aldi)
Mix-ins (I used conversation candy hearts and valentines day candy corn broken into pieces)


Instructions:

*Begin by covering a baking sheet with wax paper.

*Then microwave 2 cups of candy melts in a large bowl, microwaving in thirty second intervals, mixing in between, till smooth.

 *Add mix-ins and stir till they are coated. (Add as many or little mix-ins as you like. From previous times of trying this, I have seen that more mix-ins adds more flavor and is better.)


*Pour the candy mixture onto your wax paper. Use a spoon/spatula to even out the mixture. You can make it thin or thick. Top it off with sprinkling more mix-ins on top.


*Let the bark cool/harden completely. Break it or cut it into pieces (I did pizza shaped pieces).


I used a spatula to pry the bark off of the pan. The wax paper makes it easy to take off.
It's like a giant cookie. Yum!


Enjoy this recipe! It's delicious.

Thanks for reading. Please share this post through email, Pinterest, and more! Don't forget to subscribe! Enter your email into the follow tab to get email notifications when I have a new post!


***
I got this recipe from American Girl Magazine, September/October 2014 issue. 


Friday, January 16, 2015

Amazing animal - Orca/Killer Whale

Orca whales are amazing, intelligent creatures. They inspire me, and I want to write about them.

Orca Facts:
(facts quoted from Killer Whales by Charnan Simon and Ariel Kazunas)

Class: Mammalia
Order: Cetacean
Family: Delphiniade
Genus: Orcinus
Species: Orcinus orca
World distribution: The most widely distributed animals; found in all oceans, from the Arctic to the Antarctic; most common in colder waters.
Habits: Highly social animals; live together in groups called pods; hunt cooperatively to capture prey; make a wide variety of communicative sounds.
Diet: Fish, squid, sharks, penguins, seals, sea lions, porpoises, and other marine animals, depending upon the location.

Killer whales are the largest members of the dolphin family. The average male weighs about 10,000 pounds (4,536 kilograms) and is between 19 and 22 feet (5.8 and 6.7 meters) long. So a killer whale probably would not fit in your living room.

This is an orca compared to an average human.

"Orcas are highly intelligent, curious, and playful. Orca social groups are very complex. They graceful, amazing, killer whales are a favorite at marine parks and on boat tours." 

Fierce hunters:
"A killer whales large jaw is lined with as many as 56 sharp teeth. Some of their teeth can be as long as 4 inches (10 centimeters). Killer whales don't need to chew their food, they swallow it whole. A killer whales black-and-white coloring acts as a camouflage to help the whale sneak up on prey. For example, a seal lying on an ice floe will most likely not see a the orca because it blends with the dark water."

An extra sense:
"Orcas have very good eyesight. They can spot prey underwater and above the surface. But even with excellent eye-sight, orcas can only see so far underwater. They have an especially hard time seeing at night. So instead of using their eyes to see, they use their six sense, which is echolocation."

Growing Up in the Pod:
"Female orcas give birth to one calf at a time. A newborn orca weighs around 400 pounds (181 kg) and is about 8 feet (2.4 m) long. Right after the orca is born the mother pushes it to the surface of the water for it's first breath. As the calf grows, other members of the pod teach it hunting and swimming skills and play with it. An orca pod is basically a big group of sisters, brothers, cousins, aunts, uncles, and grandparents. These family members all take care of each other."
                                                      A baby nuzzling with a mother.


Orcas are very loving and smart. In fact, they have a part of the brain that humans don't.
That brings me to a point that was a big inspiration for this post. Orca whales are captured to be put in big attraction parks like SeaWorld, Loro Parque, MarineLand, and A LOT more. Mother orcas scream and cry as their babies are taken away from them. In the movie "Blackfish" they interview a fisherman who was capturing orcas. He said he just lost it when they took the babies away and started to cry. It's like taking a kid away from his mother at the park. It's mean, bad, and I hate it. Orcas belong in the wild. There was recently a walk to free Lolita, an orca whale that has been held captive at Miami Seaquarium for 40 years. Her tank is 60-by-80-feet and is 20 feet long. It's way too small. On January 17, 2015, thousands of protesters gathered from all around the world outside the Seaquarium, to ask for Lolita's release, and asked other supporters to tweet #FreeLolita on twitter. Some people say that she will die in the wild. They say Miami Seaquarium is her "home". Lolita won't die in the wild, and even if she does, she'd rather that than live miserably in her tiny tank. Lolita used to live with another whale, Hugo. But he died March 4, 1980, by repeatedly smashing his head into the walls of the tank. We'd rather see Lolita die free and happy in the wild then do what Hugo did.

Could you live in a bathtub for 40 years?
If freed, whales like Lolita, that were born in captivity, would be put into a "sea pen" - a netted off area near the coast) for rehabilitation. When they are there they would learn the skills of orcas in the wild. Lolita needs to be freed!

Another orca is Tilikum, nicknamed Tilly, who is the star of the movie "Blackfish". Tilikum is involved in the death of 3 trainers during his time in captivity: a trainer at the now-defunct Sealand of the Pacific in South Oak Bay, British Columbia, a trainer at Orlando's Sea World (which is where Tilikum is now), and a man trespassing on Sea World Orlando's property. Tilikum measures 22.5 feet long and weighs 12,000 pounds. His 6.5 foot tall dorsal fin is collapsed completely to his left side - a sign of a stressed and depressed whale.  Tilikum is the largest orca whale in captivity. As a person in "Blackfish" remarked, "If you were in a bathtub for 25 years, don't you think you would get irritated, aggravated, and maybe a little psychotic?!?" 

People seem surprised about all the killer-whale-involved deaths. That annoys me. They do not belong in captivity, never did, and never will. They are killer whales, that's right, killer, not cuddle whales.
Tilikum's collapsed dorsal fin. Orca whales need to be freed from captivity.

Some ways you can help are:
Learn more about killer whales and their captivity. Read books and watch documentaries.
Tell your family and friends. Tell them not to support places like Sea World or Seaquarium or other places that orcas are held captive.
Make your voice heard. Protest against captivity and help spread the word. Do blog posts, write articles or papers, post on social media, support social media anti-captivity accounts, and more.

Thanks for reading! Please help free the orcas.


***
Here are some sources I used to research this blog post:
http://en.wikipedia.org/wiki/Lolita_(orca)

http://en.wikipedia.org/wiki/Tilikum_(orca)

http://en.wikipedia.org/wiki/Blackfish_(film)

http://www.amazon.com/Killer-Natures-Children-Childrens-Paperback/dp/0531254798

Monday, January 12, 2015

Foster Cat Fun!

In this post, I will talk about fostering cats. One day, in 2012, we had the idea of fostering cats - and having no pets, thought it would be a fun experience, plus it would be a good cause.

Our first group:
Our first foster group was a litter of four kitties, not as small as kittens, but also not fully grown. They were brown/white tabbies and all had different personalities. One was really sweet, and we named him Sweetsie. One was shy and had swirly patterns, and we named her Swirl. One had tiger markings, therefore named Tiger. Lastly, there was the kind of naughty one, and we name him Stinker. The shelter changed Tiger's name to Susan though, and they also changed Stinker's name.
Here is a photo of Tiger (left) and Stinker (right).
Our second group:
Our next group was two gray/blue kittens, that we named Angel and Buddy S. They were sweet and cuddly and super cute!
                                                        Buddy (left) and Angel (right).
                                                                Me holding angel. :)

Third foster group:
Our third group was two kittens and their mother.
We named them BuddyJay and Buttercup. We fell in love with them and adopted Jay and Cup after fostering them. They are now almost three years old. It is slightly hard to believe, but BuddyJay is a gray long hair, and Buttercup is a tan/buff shorthair, and they are from the same litter. They are really sweet and amazing and adorable! They were only one month old when we got them.
Little BuddyJay - he was tiny and had an eye condition when we first got him.
Little Buttercup! She was an adventurous little one, but she was still wobbly on her legs when we first got her. :)
                                                       Cup and Jay now! <3

After we adopted BuddyJay and Buttercup, we took a little break from fostering, so we could monitor the kitties and slowly let them explore more rooms. Once we had had them for a long while, we started fostering again.

First cat (first cat not in a group): Our next cat was named Charlotte. Things were a little bit different with her, and all the cats fostered after her, though. She was fostered in my room, because the "kitten room" was made into a bedroom.
Charlotte was very sweet and loved to purr. She was about 1-years-old.
                                                                          Meow!!
Second cat:
Our next foster cat was kitten named Charlie.
                                                                          Purr!
He was such a cutie! Although, it's kind of hard to sleep when you have a kitten pouncing on you.
Charlie was a pretty calm kitten and loved to snuggle and play.

Third cat:
The next kitten was very hyper. He was cute, yes, but he loved to play fight with your hand or foot or anything and he was pretty naughty, adorable, but naughty. He just had so much energy.

                                                          Getting ready to pounce!

Fourth cat:
Our next cat was an adult cat name 'Jughead'.  Please know we did not name this cat - he was named by the shelter. I don't know why they named him that, all I know is I didn't like the name. Anyway, Jughead was very cute and snuggly. He did have a very bad cold/cough and so he needed care.
                                                                Mew. Aww, so cute!
Fifth cat:
Our next kitty was named Nala. She was very sweet and happy and cute. :)
                                                         She had such big, pretty eyes!


Fourth foster group:
This is actually kind of a funny story. We went to drop off the previous cat - Nala - at the shelter so she could be put up for adoption. So on the way home we were kind of talking about how we wanted some kittens. Well, we get home and a in a little while, the shelter calls. "Hi, can you take a mom and five kittens?". So we picked them up the next day, and they were so adorable! They were tiny and stayed in the crate for at least a day (probably more), because they didn't need to come out. They nursed from the mom and slept in the back of the crate. Only the mom came out to get food and water. Well, eventually, they came out. They were really cute. We fostered them during the summer of 2014, so our fostering was spread out.
                                             All of the kitties are piled up in this basket!


The kittens nursing from their mom. Purr!

So those are all the cats we have ever fostered. After the last big group, we decided to take a little break. Hopefully, we will be able to foster more soon! :)

Thanks for reading this post - I hoped you enjoyed it. Please comment, and also share this post! You can Pin it on Pinterest, email it to a friend, and more!